
Ever wondered what it feels like to insert your own voice for your presentation to level up the assignment and add a personal as well as a unique tone to it? Wonder no more because, through Google Slides, we can insert our own or record audio, liven it up and win the day.
It is an excellent feature within Google Slides to make presentations a lot easier and more interesting.
If you have ever tried doing it on Google Slides, you must have experienced that Google Slides has no built-in tool as of now to record the audio but there are a number of extensions that will aid you in inserting the desired audio in Google Slides.
One of the most reliable extensions used by experts is the Chrome Audio Capture extension, which is easily available at the Chrome Webstore.
Keep reading to learn all the steps and tips to record audio in Google Slides.
In the process of recording audio, you will need the help of two applications:
- Google Drive
- An audio recording extension (Audacity, Movavi Screen Recorder, Chrome Audio Capture, etc.) or websites like Rev Online Voice Recorder.
Creating a voice recording.
The Internet is blooming with numerous voice recording extensions and as long as you have a good working microphone and noise-free environment, you are ready to create an audio for your Google Slides.
METHOD 1: Record Audio through extensions available at Chrome Web Store.
Adding audio through Chrome Audio Capture extension in your Google Slides.
Step 1: Open Chrome Web Store and search Chrome Audio Capture.

Step 2: Click on Add to Chrome and your extension will be added.
The extension icon appears in the top right corner of Chrome, it’s where your extension is added. https://www.rev.com/onlinevoicerecorder
METHOD 2: Adding audio through Online Voice Recording Websites.
The quick and reliable way to record audio files for your Google Slide is by using Online Voice Recording websites like Rev Online Voice Recorder.
Just open the website, give permissions, start talking, and save the file.
Here’s how to record and save the file through Rev Online Voice Recorder.
1: Open the website of Rev Online Voice Recorder. Click on the Record button.
2: Accept the permissions asked by the website.
3: Click on the Download button and your audio file is saved.

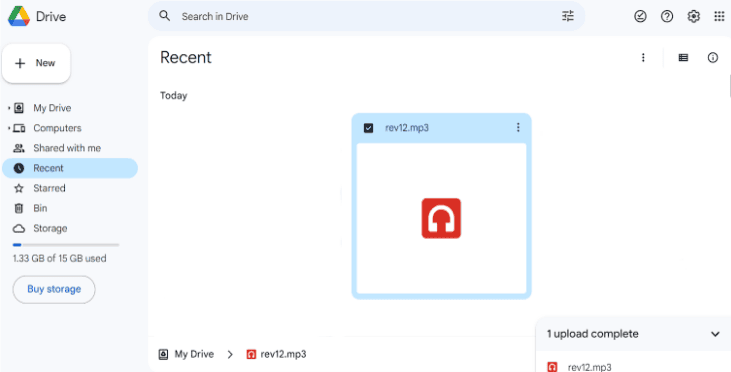
4: Open ‘Google Drive’ to save your audio file in Google Drive.
A. Click on ‘File upload’ and a Dropbox from ‘Your Files’ will appear.

B. Select the audio file you recorded to insert in your Google Slides and click on ‘Open’.

C. Audio is uploaded in progress, visible in the bottom right corner.

D. Click on ‘Recents’ and your recently uploaded audio file will be visible in your Google Drive.
Now that the audio file is uploaded on Google Drive you are ready to embed it in your Google Slide.
TIP: Share audio separately from Google Drive when sharing Google Slides with your team.
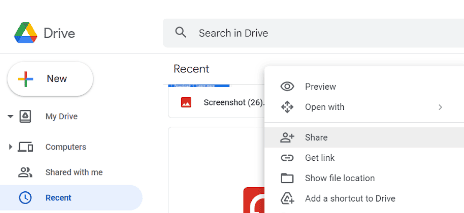
Right-click on the audio file and click on ‘Share’. Choose the option of ‘Anyone with Link’ for the Google Slides viewers to play it.
5: ‘Open’ your Google Slides presentation or create a new one.
TIP: Type in Slides.new to instantly create a new one!
6: Click on the ‘Insert’ dropbox.

7: Select the ‘Audio’ option and then choose the file you have uploaded on Google Drive.

After you select your desired audio file, click on the ‘Insert’ option to embed the audio file in your Google Slides.

After you embed the audio file in your Google Slide a ‘speaker-like icon’ will appear on your screen. You can drag it anywhere on your slide and it really helps to check if your audio is playable or not.

8: On the day of your presentation, make sure that you are logged in to both versions of Spotify (Desktop and Web Player).
You will be required to click on the link and it will redirect to the song, album, or playlist you have embedded through Spotify.
Adding this feature to your Google Slides will make your presentation more interactive, give it a unique tone, and will enhance the understanding of the viewers, so go ahead and use this feature in your next presentation! With these two easy methods to record your own audio in Google Slides, you are ready to rock your presentation!
